Installing Android on an old Windows tablet
Topics: Android
Introduction
I had an old tablet, the Acer Aspire Switch 10, which was barely running Windows 10 due to its low-end specs. I wanted to repurpose it as an Android device for simple games and web browsing as a gift for my cousin.
Specifications:
- CPU: Intel Atom Z-series quad-core
- RAM: 2 GB DDR3
- Storage: 32 GB eMMC
- Display: 10.1-inch 1366x768 IPS touchscreen
- OS: Windows 8.1 (32-bit), upgraded to Windows 10
As you can imagine, these specs really struggled with Windows. So, I started searching for a lighter OS to install on it. I stumbled upon the Android-x86 project, which seemed like the right fit. However, there was a problem with installing it on this tablet.
64-bit CPU, 32-bit UEFI
These types of Windows tablets had a mix of technologies. They had 64-bit capable processors, but a 32-bit UEFI. So, I needed to find a 64-bit OS that supported 32-bit UEFI boot, or simply, one that used bootia32.efi. There were a few options that seemed interesting:
- Android-x86, as mentioned above
- Fedora, version 31 or newer
- Bliss OS
However, there was another hurdle called Secure Boot. To install another OS, you first need to disable Secure Boot.
Disabling Secure Boot
To disable Secure Boot while still running Windows, follow these steps:
- Shift-click Restart -> Troubleshoot -> Go into UEFI
- Set the Supervisor password to whatever you want to access locked options
- Disable Secure Boot
- Save and exit
While you are in the UEFI menu, you can also set booting from an external disk as the primary boot device. You can also try adding the boot files as exceptions, but this shouldn't be necessary with Secure Boot disabled.
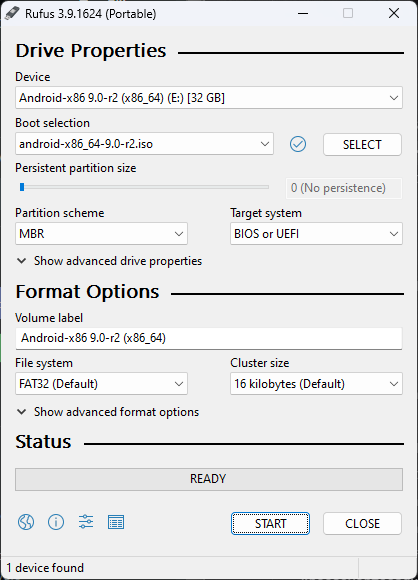
Making a Bootable USB Stick
I used Rufus to create a bootable drive. Regardless of the OS you decide to try, the options in Rufus should be as shown in the picture below.
Android-x86
Android-x86 is an open-source project that ports the Android operating system to devices powered by x86 processors, rather than ARM chips. The project provides a complete solution for Android on common x86 platforms and can co-exist with other operating systems or data in the chosen partition. It supports various filesystems, including NTFS, allowing for installation alongside Windows.
This was the first OS that I found and tried. You can download it from FOSSHUB. I disabled Secure Boot, created a bootable USB stick using Rufus, and finally performed a clean install on the tablet.
- The good: it worked!
- The bad: the screen rotation was inverted, there were some UI bugs, and it was based on an older Android 9.
So, I continued searching and found that Fedora might be suitable.
Fedora
Fedora is a popular Linux distribution developed by the Fedora Project, which aims to maintain a six-month release schedule, offering new versions in May and November. Fedora Linux is known for its cutting-edge software and frequent updates. It is a community-driven project, with contributors from around the world working together to create, test, and improve the operating system. Fedora Magazine is a website that hosts promotional articles and short guides contributed by the community about free/libre and open-source software that runs on or works with the Fedora Linux operating system.
I tried Fedora Workstation 40 beta, which you can download from the official site, and it booted with everything working.
- The good: beautiful GNOME interface, screen rotation working properly.
- The bad: it was sluggish, like being back on Windows.
On to the last candidate, Bliss OS.
Bliss OS
Bliss OS is an open-source operating system based on Android, designed to run on various devices such as Chromebooks, Windows/Linux PCs, and tablets. It offers a range of customization options and added security features. The OS is compatible with x86/x86_64 compatible CPUs and supports both BIOS/CSM and UEFI boot. Bliss OS allows users to switch between desktop and touch styles.
Bliss OS offers three different Android versions: 11, 12L and 13. Feel free to try them all and see which one seems more performant. Also, test all the functionality because these devices are finnicky and can have some Bluetooth or WiFi problems with some OS builds. I opted for Bliss OS 14 (Android 11) since it seemed a bit easier on RAM. You can download them from SourceForge, links are on the official site.
- The good: everything worked, solid performance, looks nice.
- The bad: nothing important.
Bliss OS installation
The installation procedure is as follows:
- Disable Secure Boot
- Make a bootable USB stick
- Install from bootable USB stick according to this guide
- Remove USB stick so you can boot into Bliss OS
Sources: